WARNING: Still Under Construction
Unfortunately most of my projects since we moved have been related to home improvements and repairs, not fine woodworking. The workshop quickly became a complete mess. Having three litters of puppies and some serious health issues, including heart bypass surgery November of 2017, didn't help either. Combine all that with higher than normal temperatures the past couple of years with no AC in the shop and the workshop has suffered greatly.
In recent months I've finally been able to clean up much of the mess and get a lot of the stuff that didn't belong in the workshop out where it can be used or stored. I've been able to make some plans for cabinets, sets of drawers and even an actual workbench. I recently completed an outfeed table for my SawStop.
I'm starting to rekindle my initial excitement of having a workshop. While I did have major issues with my heart I've been gaining strength and stamina. The workshop is finally starting to come together. I'm truly enjoying the process of reorganizing the workshop and making it a better place to work and am very excited about the possibilities. Finally we were able to add air conditioning in March of 2020.
Most of the photos below were taken soon after we moved into our home. I've been updating them when possible. Hopefully soon I'll be able to up date all of them.
The view from the workbench area of the new shop is fantastic. The windows fill the workspace with light during the day. When I designed the building’s layout I made sure that the workshop had this view. Once I get my workbench built it will go under these windows along with some cabinets and other tool storage.
This is an updated photo.
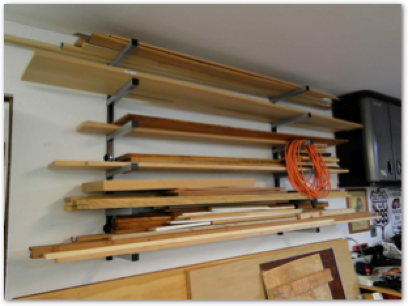
These lumber racks were one of the first additions to the workshop. Unfortunately when I installed them the first time they were about two inches too low. They have now been reset on the wall. The storage bins were added to the wall for small items like nuts, bolts and just about anything that will fit. Also shown are my compound sliding miter saw and my band saw.

In addition to the long rack I installed one for shorter lumber above the area where sheet goods are stored. This wood storage area actually infringes on the garage half of the building. I will be building a rack for sheet goods in this spot when I have the time and money necessary for the project. In the mean time they just lean against the wall.
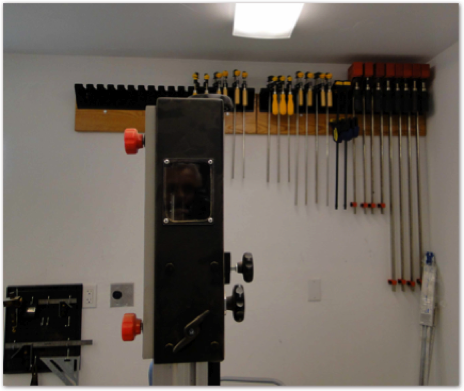
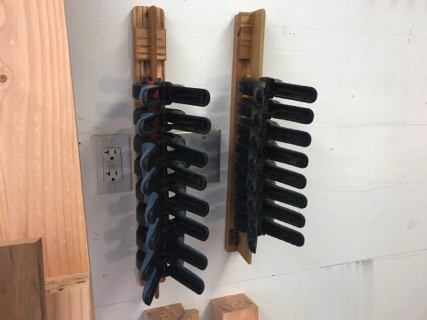
I attached one of these clamp racks to the wall studs, but there wasn’t room for the second one. Then I noticed some ash I used for table extensions in our old dining table that I made many years ago. I split one in half and mounted a clamp rack to each half. The ash was then attached to the wall studs -- problem solved. Since the picture was taken I found some great sales on clamps. The racks are now almost full. But, a woodworker never has enough clamps. I've also added racks for some of my other clamps.
I had planned to add a router table to my table saw. That’s one reason that I bought the Incra fence for it. The more I researched router tables the more I realized that having a stand alone table would be better for now. I can add another one to the table saw later. Besides, Rockler had a great sale or coupons for all the components I needed.
After I got all the Rockler components and assembled the router table, I got an email stating that Incra had a good sale on their small router table fence. Since I already had their Wonder Fence add on I emailed them about adding it to the fence that was on sale. As a result of my email I got a call from one of their Customer Service representatives. He said that I needed an upgrade on the fence so the Wonder Fence would fit. He worked out a spacial package deal for me at the sale price. Incra is a great company to work with.
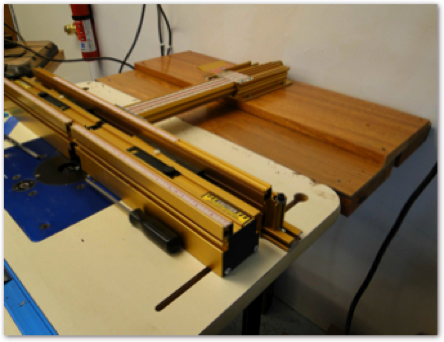
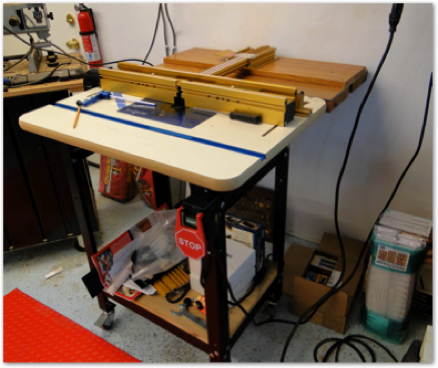
I had to extend the router table to accommodate the Incra fence. To do that I added steel extensions to the Rockler table stand. On top of them I added two scrap 2x6 boards and discovered that some scrap laminate flooring would make the table extension perfectly even with the top of the router table. I added a scrap of mahogany on that to mount the Incra jig. If I was able to do this all over again I would have waited until I could afford an Incra table top and stand or I would have made my own stand. While this set up works it's not as stable as I would like and I need fix that somehow. My future projects for the workshop include adding better dust collection, drawers and other storage to the Rockler base. I have the design drawn up but I'm lacking the materials, money and time.
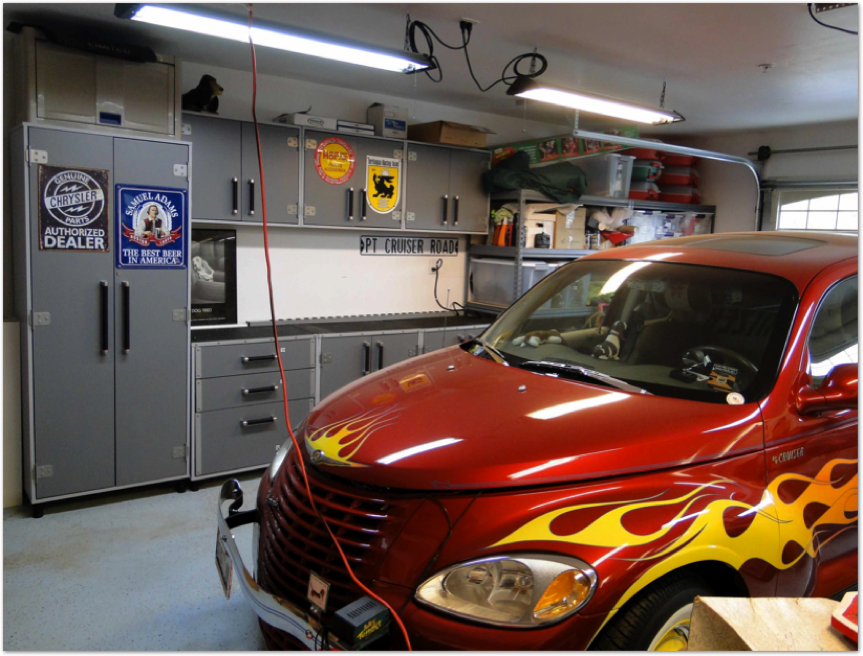
The garage side of the building houses my custom 2001 PT Cruiser and has a storage area along the wall. The shelves are almost filled with Christmas decorations, but the cupboards and drawers are starting to get filled up. We will be deciding what needs to be stored in them and getting them filled up.
Recently I was able to find a place for some of the things that were still in the garage after we moved. We're now able to get our Chrysler Town & Country van into the garage. I was so happy when we cleared space for the van that I had designed the building to be deeper than most garages. The van will fit into the garage far enough so that we can open the back hatch and still have my plywood storage and walkway in front of it. Yes, I need a picture of that. I'll be adding information on this side of the building on my Garage page.
It’s all still a work in progress and will be for quite a few more months, but at least I'm finally making progress. The progress is significant enough for me to actually get back to my woodworking and I’m really enjoying that. I am finally able to post some pictures and videos of some more new woodworking projects as well as improvements to the shop. Some of the videos have been added to my YouTube channel. I am so happy that we decided to fully insulate the building when we had it built. I'd sure hate to have to do that now that it's full of stuff. The insulation makes the workshop more pleasent to work in and will allow the future addition of AC and heating.
This website was created and is maintained by Don Bullock.
He can be reached at basithd@yahoo.com
All material on this website is copyright by Donald W. Bullock
All rights are reserved


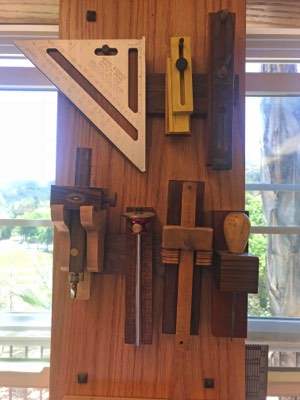
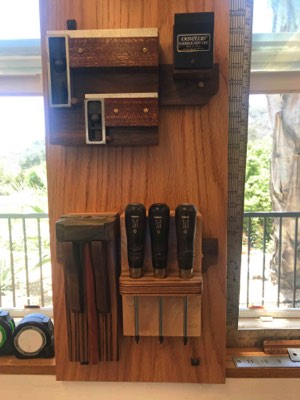
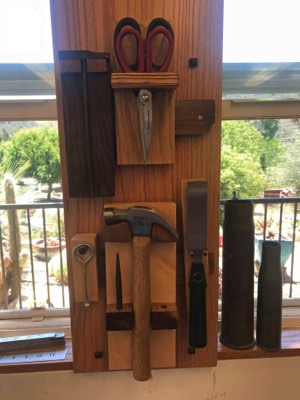
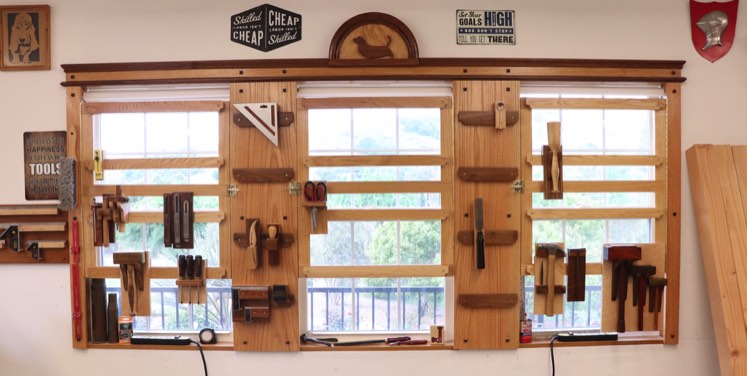
One of the projects I've been working on is some tool holders between the windows of the shop. These are tools that I have been using a lot or will in the future once my workbench is built. It will go just below these windows.
The tool holders are all made from hardwood scrap. I decide which tool is next and then look for the wood to make the holder. I documented making one of these in my video on making the holder for my tac hammer and have since added a video showing how I made a tool holder for my dead blow mallet.
I'm still not even close to adding all my tools. In addition to these French cleats I have plans to make some tool holders that will go over the windows. My plan is to make frames with French cleats going across the windows. They will be hinged on one side so that I can swing them out to reach the windows. They will hold some of my larger hand tools, especially my saws and perhaps chisels.
I've already found this tool wall be be a great asset to my shop. My tools have a place and I'm very careful to make sure that they go back where they belong.
Starting with the upper left section (top photo) I have my marking gauges, awl, bevel guide, framer's triangle and a handy measuring rule that I may make a video on sometime. Then below those (middle photo) I have some squares, my Veritas saddle square that I've made a video on, my Kings Fine Woodworking mini Thor's hammer and a set of Narex square drive screwdrivers. The other photo (bottom photo) shows my tac hammer, two different types of scissors which I plan to show in a future video, my Veritas flush cut saw, a hammer with nail set and one of those tools that's designed to open paint cans. I still have a little space in one French cleat in this photo and two more above it. I'll make tools for those spots when I get a chance. This wall is constantly changing as I make new holders.
I know that some have given up on French cleats for their tools. So far I've been very pleased with mine. The holders however were designed so that the french cleats can be removed from the backs and they can be flush mounted. I did that partly because to the left of the windows I have some wall space where I plan to make a tool cabinet. I'm sure that some of these tool holders will end up in there and something else will take their place in these French cleats. Since these holders were all made from scrap wood I'm only out the time spent making them if I end up doing something else with a particular tool. I'm already going to be doing that with the mini mallet.
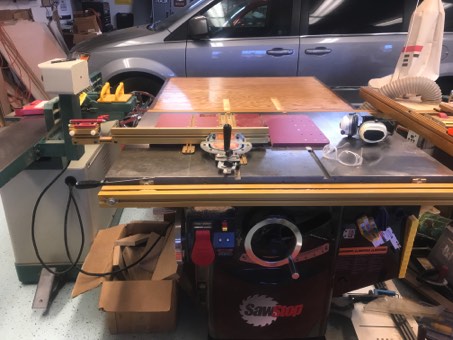
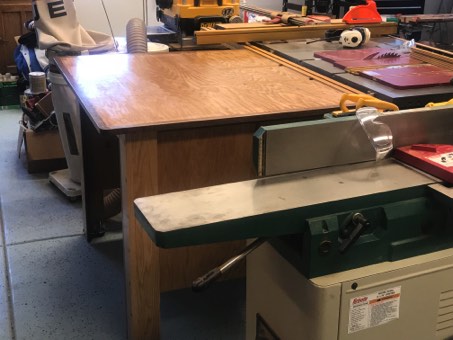
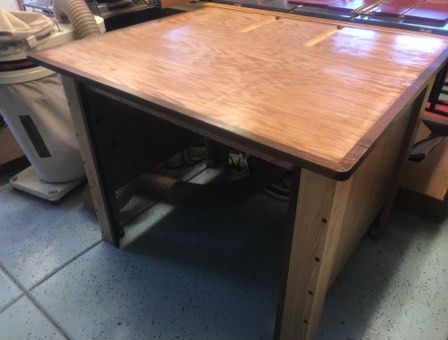
One of my most recent large additions to the workshop is an outfeed table for my SawStop. This has been a long awaited shop improvement. I no longer have to wait until Pam is available to help me rip long boards or cut sheets of plywood.
The design for this outfeed table was taken from one made by Marc Spagnuolo, the Wood Whisperer. He's actually made two different versions for his shop.
I changed Marc's design to meet my needs. Instead of a shelf underneath that I would clutter up I left the space open. I did this partly because sometimes I need to have access to the table saw dust collection and cords that are on the floor behind the saw. I also wanted drawers rather than just a big shelf. My plan is to make a cart with drawers for table saw items that will roll into the space. That's one of my upcoming projects.
There is a video of this project on my WB Fine Woodworking YouTube Channel.
My Rockler Bandy Clamps and large spring clamps were just thrown in a box. That wasn't very convenient so I made these clamp racks for them. The racks are designed so that I can take all the clamps to where I need them for a project in the shop. This has turned out to be a great solution to storing these clamps.
There is a video of this project on my WB Fine Woodworking YouTube Channel.